
Thank you Dana for sharing your delightful nugget boxes. Dana did a wonderful job on these adorable little boxes using the October Contest Kit.
Enjoy,
Loreen
WOC German Glass Glitter SALE NOW!
13 years ago

Thank you Dana for sharing your delightful nugget boxes. Dana did a wonderful job on these adorable little boxes using the October Contest Kit.
Enjoy,
Loreen

Here are two more beautiful cards from our September Contest Kit Winner, Ann. She is really doing a wonderful job with her free October Contest Kit. Thank you for sharing these beautiful cards with us =)
Hugs,
Loreen

I thought this lovely layout was classic and beautiful. Thank you Dana for sharing your layout using the October Contest Kit. Awesome job =)
Hugs,
Loreen

The winner of the October Kit submitted this beautiful card that she made with her kit. Be sure to visit Ann and her beautiful work. Thank you for sending us your work.
Hugs,
Loreen
This is the BIG project I was talking about, the one I said you were going to love using the Wish on a Scrap Kit. It looks like a purse, but it's actually a little photo holder! That's right, open this darling up and you've got a spot for 2 pictures! What a way to showcase your work!
I got this project idea from a blog called Stampspaperscissors. However, since I didn't have many of the items she used for her project, I kinda created my own variation of this darling little project, perfect for a gift for any female in one's life.
And I LOVE the way it looks at an angle. That fold is just so cool I think. Sure it could have been a flat based purse, but this gives it so much more character!
And here's the little detail on the front of the purse. The ribbon and hardware are not from this month's kit, but everything else is.  As for the interior, well I decided to use 2 stamped images in the smaller areas, you could always use flowers but since I'm a book lover I decided to use images related to that. You can also see from this picture how I used velcro to adhere the top together.
 There are a few more pictures on my blog. Please swing by and say hello!

I just wanted to post a beautiful project that Ann made with the September kit and wish her congratulations on winning the October Contest Kit. Check out Ann and her wonderful work on her blog. Join me in congratulating her on win =)
Congrats,
Loreen


I cannot get by without making a card! I love to make cards, love bling! and I love this October kit! The ribbon is from my stash! Everything else is from the Oct. kit. The chipboard is from the Sept. kit! I made an envie to go with this card. ON... drum roll.....The ENVELOPER!! What a cool tool that is! I made the box envelope. Just the right amount of room in there to make your cards EXTRA thick! Of course this won't be going through the mail, but I just think its that added extra touch to a card!
Thanks for stopping by, make sure you check out Kim and Kimmies creations!! AWESOME!!
hugz
deb
OK Crafters....so I told you I was working on a SUPER fun project with this kit! Here are my nugget tins that I have been working on! These are SO easy and fun to make! You can head on over to Wish On A Scrap to get your tins, paper, adhesives, and flowers to put these fun tins together! These would make WONDERFUL gifts for family, friends, and teachers....who doesn't love chocolate! I know I do!
 To make these fun tins all you need is: Hershey Nuggets, your little pieces of paper (cut 1" x 3") for each nugget, your tin (of course), and whatever you would like to decorate the outside of the tins!

Can I just tell you, every month I say, "WOW, this is the best kit Loreen has EVER put together..." but this month, she's blown me away. The October Wish on a Scrap kit is by far the best kit I've seen for this month.
So I thought I'd share my first creation with it. Sorry that the pictures are a little dark, I took them at 11:30pm and there wasn't much light. But you can see what I made. It's a card holder with 3 cards. The papers are just so yummy, I've been hording it like a fool!


Card 3 (and my favorite of the trio)...

And the notecard holder...

 And of course the inside of the card done with Tim Holtz Distress Inks:
 I can't wait to see what everyone else creates with their kits! I have another SURPRISE in the making! I just have to add finishing touches to it and then I will have another post! See.....I told you all I can't keep my hands off of this kit!!!

Kim is right, this kit is FABULOUS!! The colors are rich! All of my favorite colors on paper! I did something I normally don't do, ALTER! I'm not good at it, for some reason getting from the brain to the fingers don't make it! My granddaughter Reese had her first birthday! Her colors? Pink and brown!! Paper was perfect for something to make for her in rememberance of that party! So I made a coaster frame. Put my favorite photo of her in it, and give it to my daughter M, for Reeses room.
The idea's are endless with this paper!!! Super kit Loreen!!! Love everything in there! THANK YOU!!!
hugz
deb
Let me just tell you! Loreen has out done herself again! This Wish On A Scrap October Kit is AWESOME!!!! It's by far my favorite one yet....probably because it consists of lots of pink and brown...I guess I am bias with those colors! Hee hee!
The following is a card that I made with my kit! I will have another one to share with you soon! To get the recipe for this card, you can head to my blog.
Welcome to my 1st Tutorial for Wish On A Scrap! I was so excited when Loreen asked me to make a tutorial for all of you with such awesome supplies! I had so much fun playing with these beads....just beware when you play you will have little beads all over the place. hee hee! Well I sure did! You will be taking your everyday Cuttlebug embossing folder and turning it into a whole new tool to give you a very elegant look!
For this project you will need:
1. Cuttlebug with A plate and both B plates;
2. Cuttlebug Embossing Folder of your choice;
3. Ink (I used Tim Holtz Distress Ink);
4. Brayer;
5. Sticky Powder; and
6. Micro Beads (these come in MANY colors....e-mail Loreen what color you want and she can definitely get them for you!)
(All of the above items can be purchased from Loreen at Wish On A Scrap...you should head on over to get your supplies!) First, you are going to take your brayer and get it all full of ink (make sure your folder has LOTS of ink on it....you are going to have to work fast so that your ink doesn't dry before you put your sticky powder on). Roll your ink on which ever side of the embossing folder that you want your beads on. For this project I chose the background area to have the beads and then then branches would be embossed without any beads. (Don't worry about your embossing folder getting stained, I just rinsed mine off with water almost 20 minutes after I was done making my project and the folder cleaned right up!)
 Next, you are going to place your paper inside your embossing folder. Then sandwich your folder as you normally would when embossing. (A plate on the bottom, then a B plate, then your embossing folder, and then another B plate.) Crank this sandwich through your Cuttlebug.
 Take your paper out of the embossing folder and immediately cover the paper full of sticky powder as shown below.
 When you tap off the excess sticky powder your paper should look like the below picture.
 You will then use your heat tool to heat up all the sticky powder which will create the adhesive so your beads will stick to your paper.
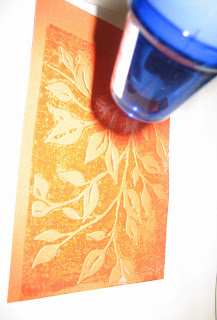
Once you have all the paper nice and warm, immediately dip the sticky side of your paper into your tub with your micro beads. You might have to rewarm the sticky powder to get all of the beads to stick.
After your paper is completely covered in beads, take your heat tool and warm up the whole page once again to set the beads. And that is how you create an awesome bead page for your cards or scrapbook pages. Below is a card that I created with this technique. The beads add that extra flare to your card!
 Hope you enjoyed this tutorial! Now, head on over to Loreen's store and get your supplies so you can play with beads too!
 Loreen sent me another fun project to test out and give my opinion to the masses, it's called Magic Stamp and is a piece of foam that can be heated up and takes the impression of anything you want to use to create a stamp. You can use, clothes pins, buttons, crayons, flowers, etc. Really, anything you want to use for your impression.
It all sounded so fascinating that I had to try it out. And what better item to use for my test run, Matty's foot (thank goodness that I did it a few days ago, at 6 months his foot is already so big it took up the entire piece of foam!).


