
Welcome to my 1st Tutorial for Wish On A Scrap! I was so excited when Loreen asked me to make a tutorial for all of you with such awesome supplies! I had so much fun playing with these beads....just beware when you play you will have little beads all over the place. hee hee! Well I sure did! You will be taking your everyday Cuttlebug embossing folder and turning it into a whole new tool to give you a very elegant look!
For this project you will need:
1. Cuttlebug with A plate and both B plates;
2. Cuttlebug Embossing Folder of your choice;
3. Ink (I used Tim Holtz Distress Ink);
4. Brayer;
5. Sticky Powder; and
6. Micro Beads (these come in MANY colors....e-mail Loreen what color you want and she can definitely get them for you!)
(All of the above items can be purchased from Loreen at Wish On A Scrap...you should head on over to get your supplies!) First, you are going to take your brayer and get it all full of ink (make sure your folder has LOTS of ink on it....you are going to have to work fast so that your ink doesn't dry before you put your sticky powder on). Roll your ink on which ever side of the embossing folder that you want your beads on. For this project I chose the background area to have the beads and then then branches would be embossed without any beads. (Don't worry about your embossing folder getting stained, I just rinsed mine off with water almost 20 minutes after I was done making my project and the folder cleaned right up!)
 Next, you are going to place your paper inside your embossing folder. Then sandwich your folder as you normally would when embossing. (A plate on the bottom, then a B plate, then your embossing folder, and then another B plate.) Crank this sandwich through your Cuttlebug.
 Take your paper out of the embossing folder and immediately cover the paper full of sticky powder as shown below.
 When you tap off the excess sticky powder your paper should look like the below picture.
 You will then use your heat tool to heat up all the sticky powder which will create the adhesive so your beads will stick to your paper.
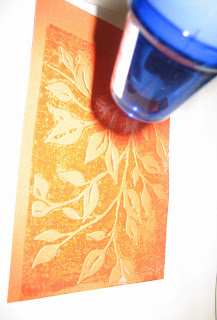
Once you have all the paper nice and warm, immediately dip the sticky side of your paper into your tub with your micro beads. You might have to rewarm the sticky powder to get all of the beads to stick.
After your paper is completely covered in beads, take your heat tool and warm up the whole page once again to set the beads. And that is how you create an awesome bead page for your cards or scrapbook pages. Below is a card that I created with this technique. The beads add that extra flare to your card!
 Hope you enjoyed this tutorial! Now, head on over to Loreen's store and get your supplies so you can play with beads too!


WOC German Glass Glitter SALE NOW!
13 years ago


14 comments:
What a beautiful effect! You also did an awesome tutorial: photos and instructions very effective.
Your card is lovely Kim. I made quite a few of these when I saw it on the PWA site.
Beautiful work Kim!
This is beautiful. Thanks for the fun idea. I can't wait to try it!
It's just beautiful! I'm going to try and give it a shot this week! I love this elegant look.
What a GREAT tutorial, Kim!! I love it!! I will have to try it!! That would be after I get another brayer!! Haha!! I should have kept the last one!! Thanks for sharing such an awesome technique! You ROCK!
This is a neat tutorial and idea Kim! You rock!
What a great idea! Thanks for the tutorial.
oh thanks for the great tutorial..have to try this...great card
Ohhh this looks like fun. I'll have to try it sometime soon. Great Tutorial, thanks for sharing.
Very Beautiful!!!!! I will have to try that technique! Thanks for the tutorial!
I love this effect Kim. I can't wait to try it. Thanks.
AnnS
Wow, so very Kool!!!!!! Thanks for sharing & the tutorial!
WOW - how gorgeous!
Post a Comment